How to Strip a Wooden Floor
Summary
– Step 1: Before patching a wood floor
– Step 2: Prepare the fibreglass patching mortar
– Step 3: Pour the fibre-reinforced patching mortar on the floor
– Step 4: Spread the patching mortar on the floor
Levelling a wooden floor is to balance the entire surface before laying a covering on it, such as carpet, tile, linoleum …
– If the defects of flatness (holes, cracks, hollows, etc.) are very localized, it is not necessary to make a levelling, and it is enough to fill the gaps with wood paste.
– If your floor is not level over a large area, levelling is required.
It is common to level a cement floor, but you can also level a parquet floor. The levelling technique is the same, but a fibrous levelling mortar is used for a wooden base.
Important: If the floor is heated, turn off the heat at least one day before levelling. Also, turn off the radiators.
1. Before levelling a wooden floor
Assessing the flatness of the wood floor
To find out if the floor needs to be levelled:
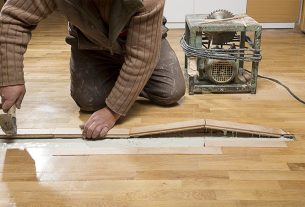
– Put your eye to the floor in different places in the room and look. Locate irregularities in the floor (hollows, cracks, loose strips …).
– Put a 2m ruler on different places of the floor. If the difference in level (the space between the ruler and the floor) does not exceed 7mm under the ruler, patching is unnecessary. Fill holes and cracks with wood filler.
Wooden flooring is only levelled if the irregularities are greater than 7mm, on large surfaces.
Prepare and clean the wooden floor.
Before levelling the floor:
– Nail down any slats that move. Fill cracks with wood filler.
– Remove and replace protruding nails.
– Sand and vacuum the floor to remove dust.
– Make sure the underside of the floorboards remains ventilated to prevent rotting
If the floor is damp
Before proceeding with the patching of the floor, it may be helpful to call a professional who will diagnose your floor.
He will determine:
– The risk that the floor will warp due to moisture in the patching mortar.
– The risk is that the floor will rot if the patching smothers it. This is because the inner surface of the floorboards must remain ventilated.
Never level a wet floor. If necessary, treat the cause of the moisture in the wood floor before levelling.
2. Prepare the fibre-reinforced levelling mortar
Fibre-reinforced patching mortar is sold as a powder to be mixed with water.
This mortar is self-levelling and easy to apply because it spreads by itself. To prepare the fibre-reinforced patching mortar :
– In a trough or mason’s bucket, mix mortar and water according to the proportions indicated on the package.
– Mix the water and mortar with a mixer or drill equipped with an electric whisk, and set the electric mixer or drill to a slow speed.
– The resulting mixture should be smooth and fluid without being too liquid.
– Let the mixture stand for 2 minutes.
3. Pour the fibre-reinforced patching mortar onto the floor
Once you have prepared the mixture and let it rest, pour and spread it on the floor in successive areas.
Start on the side opposite the door and finish at the door so you can walk out.
4. Spread the levelling mortar on the floor
Fibreglass patching mortar is easy to spread because it is self-levelling. Once you have poured it on the floor:
– Spread the mortar with a smoothing trowel, which is also called a Flemish trowel.
– Use horizontal movements from right to left and left to right to spread the mortar. The goal is to obtain a 30 mm thick layer.
– Let the mortar dry, once applied, for the time indicated on the package, without exposing it to drafts or heat.
– Once the levelling mortar is dry, wait 3 days before laying a new floor covering.
Tip: If the surface shows slight unevenness after drying, sand the floor. If the imbalance is significant, apply a second layer of self-levelling mortar, following the same procedure as for the first layer.
Materials for levelling a wood floor
|
Levelling compound |
|
Smoothing machine |
|
Drill with mixing whip |
|
Aluminium ruler 2 m |
|
Mason’s bucket |