
Summary
– Step 1: Install the vapour barrier
– Step 2: Case 1: Install the first layer of insulation on a flat floor
– Step 2: Case 2: Install the first layer of insulation on a floor with surface joists
– Step 3: Install the second layer of insulation on an attic floor
– Step 4: Protect the access hatch
– Step 5: For a chimney passage
This insulation system for lost and accessible attics is made up of:
– A roll insulation:
◦ mineral wool (glass, rock) or plant wool (hemp, cellulose, recycled textiles);
◦ of thickness varying from 50 to 100 mm;
◦ length from 2.40 to 10 m, width from 0.35 to 1.20 m.
– Of a kraft vapour barrier or metal cladding:
◦ integral with the insulation;
◦ or in the form of a film.
Caution: when using mineral wool, wear gloves, loose clothing and a mask to protect yourself from glass and rock particles.
For optimal insulation in the attic, plan to install 2 layers of insulation.
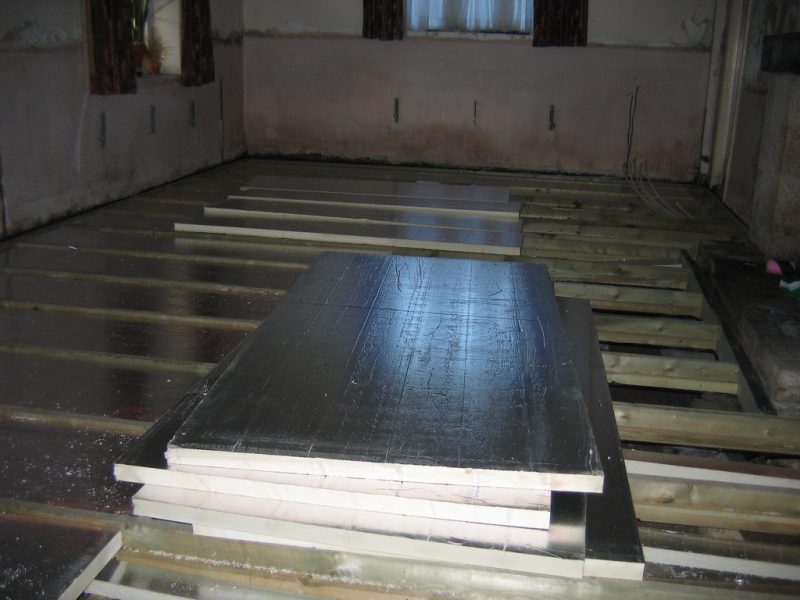
The support for the insulation in the attic is either a concrete slab, a wooden floor on joists, or a wooden floor with joists on the surface.
Be careful: if a chimney flue passes through your attic, you will have to call in a professional. This is a delicate and technical operation that must comply with a certain number of safety standards.
Here are the steps to follow to install insulating rolls on the floor of the lost attic.
1. Install the vapour barrier
Lay the vapour barrier film on the substrate, ensuring that it is perfectly continuous over the entire surface.
2. Case 1: Lay the first layer of insulation on a flat floor
– Unroll each roll of insulation directly onto the floor without any air space.
– Join them properly against the walls and the next layer.
Note: the installation of the insulation must be done edge to edge. It is not necessary to fix the insulation to the floor.
2. Case 2: Install the first layer of insulation on a floor with surface joists
The joists support the ceiling of the room below. The first layer of insulation is positioned in the space defined by the joists.
Choose insulation with a thickness that matches the height of the joists.
The insulation should be installed by compressing it slightly across its width. The dimensions of the strip should be 1 cm higher than the space to be filled.
Cut the insulation into rolls.
◦ Cut it with the handsaw.
◦ To simplify, do not unroll the insulation before cutting it. Please leave it in its packaging; the task will be all the easier and faster.
– If the width of the insulation roll is greater than the joist spacing: – If the width of the insulation roll is less than the distance between the joists: cut to the appropriate size in the length of the roll.
Install the first layer of insulation
The insulation strips must be laid edge to edge.
– Insert the insulation between the joists by laying it directly on the floor without any air space.
– Join it correctly against the wall and the next strip.
– Also, cover the eave purlin (the beam at the base of the roof slope) without blocking the air inlets.
The thickness of the first layer is the same as the thickness of the joists, so it should provide a smooth surface.
Note: it is not necessary to fasten the insulation to the floor.
3. Install the second layer of insulation on the floor of the lost attic
You have 2 possibilities to install this second layer:
1. Lay the rolls of insulation with staggered joints, i.e. by simply staggering the top layer by 10 cm with the bottom one; the joints must not overlap.
2. Lay the rolls with crossed joints; they are then perpendicular to the previous ones and the joints.
For this second layer, use insulation without a vapour barrier film. If the insulation product has an integrated kraft vapour barrier, pierce the paper with a cutter to allow the passage of water vapour.
Warning: Do not walk on the insulation. If you need to move around on the surface, especially when installing the second layer, place cleats on the bottom insulation and place boards on top of them.
4. Protect the access hatch
Insulate the access hatch with 2 layers of insulation—glue or tape the layers to hold them in place.
Take care around the edges to minimize heat loss. The insulation solution is to seal the opening as tightly as possible, depending on how often you access the attic.
5. Case of a chimney passage
Suppose a chimney flue passes through your attic. In that case, you will have to call in a professional: this is a delicate and technical operation that must respect a certain number of safety standards.
It creates a safe space around the chimney by surrounding it with a non-combustible insulating material with specific characteristics (example: insulating material made of fibres and mineral binders). The same procedure should be followed for spotlights that give off a lot of heat.
Equipment to install insulating rolls in the attic.
|
Protective mask |
$1 approx. |
|
Pair of scissors |
Starting at $3 |
|
Handsaw |
Starting at $3 |

Nice article. Keep on sharing.