
Contents
– Step 1: Mark out the location of the suspended ceiling
– Step 2: Attach the perimeter tracks to the walls
– Step 3: Put the cross studs in place
– Step 4: Install the plasterboard on the ceiling
Installing a suspended ceiling is a good solution if you want to correct some irregularities in the original roof or improve its thermal or sound insulation. It may also be necessary to create a false ceiling to run electrical conduits through it—for example, to install recessed spotlights. For this, plasterboard is the most commonly used material.
This type of work requires some knowledge in DIY, and plasterboard can be challenging to handle; it is advisable to have at least two people to take it.
To successfully install a suspended ceiling, follow these step-by-step instructions.
1. Mark out the location of the suspended ceiling
Clean and dust the old ceiling and walls. The location must be clean and sound.
– Use a tape measure to mark a 10 cm distance from the ceiling at each corner of the room.
– Temporarily fix a screw on one of the marks without driving it in completely.
– Hang the end of the chalk line on the screw.
– Stretch the chalk line along the length of the wall to the marker at the opposite corner.
– Snap the chalk line along the wall to mark the installation line of the suspended ceiling.
– Do the same on each side of the wall.
Note: You can also use a laser level to mark the installation line and then mark it with a powdered cord.
The installation line of the suspended ceiling is now marked.
2. Attach the perimeter tracks to the walls
The next step is to attach the perimeter tracks to the walls. These rails will be used to support the metal frame of the suspended ceiling.
Place the rails on the first 2 walls
– Place the first rail on one of the tracks.
– Drill holes in the wall through the track every 60 cm.
– Fix the rail in the wall with knock-in dowels:
◦ Insert a knock-in dowel into each hole.
◦ Insert the screw into the dowel.
◦ Hit the screw with a hammer to drive it into the wall.
– If necessary, cut a rail to complete the installation line:
◦ Measure the length from the end of the first rail to the wall.
◦ Transfer the measurement to a rail.
◦ Cut it with a nibbler.
◦ Position the rail on the line and drill it every 60 cm.
◦ Fix it with knockout dowels, as explained earlier.
– Lay the rails on the opposite wall in the same way.
Continue laying the rails on the other 2 walls
– Lay a rail perpendicular to the ones already laid:
◦ Please insert the new rail into one already attached by presenting it horizontally and pivoting it flat side up against the wall.
◦ Position it along the installation line and drill it every 60 cm.
◦ Secure it with knockout dowels.
◦ Complete if necessary by cutting a piece of rail to the correct measurements.
◦ Measure, cut and insert it into the rail attached to the opposite wall so that the rails meet along the installation line.
– Do the same on the last wall.
3. Install the cross studs
The cross studs, which form the suspended ceiling framework, are held by hangers attached to the ceiling.
Mark the location of the hangers on the ceiling
– Mark the axes of the hangers on the ceiling with a powder line: one every 2 meters.
– Mark, on the wall parallel to the axes of the hangers, the location of the studs: 1 every 60 cm.
– Then, transfer these locations to the line of the hanger installation axes.
– Drill and pin the ceiling at each location to screw the hangers in.
Insert and fasten the studs in the perimeter rails
– Position the studs on the marked locations every 60 cm.
– Slide the studs into the perimeter tracks: insert them at an angle and rotate them to force them in.
– Attach the ends of the studs to the underside of the rails with screws, drilling them beforehand.
Attach the hangers to the ceiling
– Measure the height between the studs and the ceiling.
– Based on this measurement, cut the threaded rods with a hacksaw.
Note: Cut as many threaded rods as there are lines.
– Screw 2 nuts onto each rod.
– Insert and screw each rod into the ceiling anchors.
– Hang a hanger by opening and closing it around the stud.
– Clip it around the threaded rod and screw the nuts on both sides of the hanger.
– Screw the hanger to the side of the stud by drilling first.
– Secure all hangers to the ceiling.
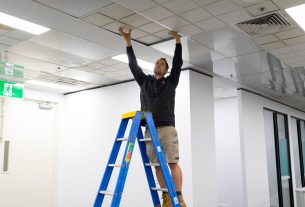
4. Install the plasterboard on the ceiling
If necessary, run the electrical conduits over the studs and secure them with clamps.
Install the insulation
If you want to insulate the suspended ceiling, it is necessary to install the plasterboards. To do this:
– Measure the distance from wall to wall, perpendicular to the cross studs.
– Cut the insulation strips according to this length, adding 30 to 40 cm.
– Insert the insulation strips over the studs and up the walls.
– Overlap the insulation strips by 10 cm and unroll them, cutting them to fit the threaded rods.
– Join the strips with adhesive.
Lay the plasterboard
This operation requires at least 2 people. Plasterboards are challenging to handle because they are cumbersome. It is possible to use a plate lifter (possibility to rent the machine).
– Position the first plate so that it rests on 2 corner walls.
– Screw the plate on each post with trumpet screws every 30 cm.
– Position a second plate by wedging it against the first one.
– Screw the plate.
– It may be necessary to cut some plates to complete the installation. This operation is not complicated and does not require any special equipment. To do this:
◦ Take measurements and transfer them to the plasterboard.
◦ Scratch it with a cutter.
◦ Break the plate along the scratch.
– Continue installing the plates in the same manner.
Once the plates are laid and fixed, it is necessary to make the finishing touches.
Materials needed to install a suspended ceiling successfully.
|
Chalk line |
|
Pencil |
|
Cutter |
|
Hammer |
|
Tape measure |
|
Drill |
|
Plasterboard |
|
Metal framing rail |
|
Hacksaw |
|
Threaded rod |
|
Screw |
|
Screwdriver |

1 thought on “How to Install a Suspended Ceiling”