Contents
– Focus on joint tape
– Step 1: Coat the board joints flat
– Step 2: Apply joint tape
– Step 3: Coat screws and inside corners
– Step 4: Install the reinforced strips on the protruding angles
– Step 5: Finish the gypsum board
Once your gypsum board wall is completed, it is time to proceed with the finishing touches. This operation aims to mask the board joints and the screw holes to obtain a perfectly smooth surface to install the covering of your choice (tiles, wallpaper…).
For best results, it is essential to follow the steps explained in this post and use a certain technique:
It is necessary to apply three coats of coating to each joint:
– a first layer to lay the strip;
– a filler coat to hold the strip in place
– a finishing coat.
Here are some tips for making gypsum board joints.
Focus on joint strips
Gypsum board partitions are finished by applying special joint tapes to the tapered edges and plaster to the screws.
Three passes or applications of plaster are recommended. If misapplied, the strips may be visible even after several coats of paint.
To reinforce the corners of gypsum board partitions, you can apply reinforced strips such as joint strips.
The plaster used to join the strips is available in different setting times: from fast to slow.
1. Coat the joints of flat plates
Start by thoroughly dusting the room and your drywall with a vacuum or broom. Otherwise, the plaster will not adhere well.
Use ready-to-use plaster or prepare powdered dressing according to the manufacturer’s instructions, using a drill-mounted mixing attachment to obtain a smooth, homogeneous paste.
Caution: The plaster should not be too liquid to prevent it from running. It should be a little pasty.
– Take some of this mixture with the flat coating knife and place it on the wide coating knife.
– Apply the plaster with the wide knife from top to bottom along the joint of the plates, making sure to fill in the gap at the tapered edges and hide the screw holes near the joint.
– Smooth the plaster from top to bottom with the plaster knife.
2. Install the joint strips
Here is how to proceed to install your strips properly:
– Unroll part of the joint tape: some have special sides; check the manufacturer’s instructions.
– Position the strip on the fresh plaster, then press it along the joint with the plastering knife. Cut it with the cutter once you reach the bottom of the wall.
– Use the larger plaster knife.
– Load up with more filler and run a coat over the strip again, making it disappear and levelling the surface.
– Remove excess filler with the knife.
Repeat on all seams.
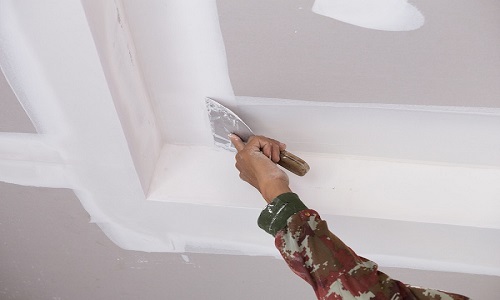
3. Coat screws and inside corners
Once the joints between the plates are finished, you must coat the screws and the angles formed by the partitions:
– At the screws, apply the plaster with a knife in two crossed passes.
– To make the joints at the level of the inset corners:
◦ Apply the first coat of plaster with the flat knife on both sides of the corner.
◦ Cut a joint strip to the desired length.
◦ Fold the strip in half before applying it in the corner over the plaster.
◦ Apply the knife to the strip from the center to the ends so that excess plaster is removed and the strip is positioned correctly.
◦ Proceed with the second pass of coating. If necessary, use a corner knife.
◦ Let dry for the time specified by the manufacturer and reapply a third coat of plaster on the strips with the wide plaster knife.
Good to know: if the result is not uniform, lightly sand the dry plaster with a sanding block and sandpaper to level the surface. Dust well, then apply a new coat of plaster as needed.
4. Install the reinforced strips on the protruding corners
The method is similar for protruding corners, but the strip is reinforced to prevent damage in case of impact:
– Apply a coat of plaster with your knife on both sides of the corner to cover it.
– Unroll the reinforced strip and cut it if necessary. Fold it in half lengthwise, then position it over the fresh coating. Apply it along the corner and press it down by hand.
– Collect any excess plaster that has accumulated on either side of the strip.
– Make the first pass of the coating to remove the strip.
– Let dry for the time specified by the manufacturer, then make the final pass.
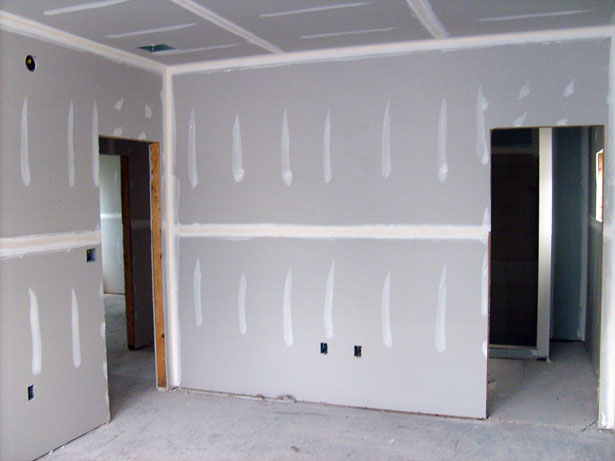
5. Gypsum Board Finishes
Before applying a final coating of your choice (paint, wallpaper, tiles, etc.), follow these steps:
– Proceed to a meticulous sanding.
– Remove dust from the joints and plates after sanding.
– Make a blocking of the funds with a suitable undercoat.
Materials for installing gypsum board joint strips
|
Joint Strips |
Starting at $6 |
|
Reinforced strips |
About $15 |
|
Sanding block |
$6 approx. |
|
Plastering knife |
Starting at $3 |
|
Flat spackle knife |
Starting at $3 |
|
Cutter |
$3 approx. |
|
Gypsum board joint filler |
About $20/25 kg |
|
Interior corner spatula |
$10 |